Originally this started as a collection of photos I wanted to post. I was a novice photographer when I started this blog. Now I have learnt some of the tricks of the trade and can call myself an amateur. I will use this blog to highlight some of my works and also some tricks/tips which I think may be useful to others.

Saturday, January 31, 2009

Using bokeh as a background element

"Bokeh" is a fancy term for blur!!! As defined by Wikipedia, bokeh refers to the appearance of out-of-focus areas in an image produced by a camera lens using a shallow depth of field
In an image we want our subject to stand out from its surroundings. Hence a bokeh will remove distracting backgrounds from claiming attention in photos. Many creative photographers will use bokeh as the main subject, but in this post I will stick to examples where I have used it as background element.

First one to start with is a portrait of my wife. The background is busy, but I have blurred it out to keep the attention on my subject.

From Blog


The second is an extreme example of a Bokeh. The entire background is made completely blurred with the subject in focus. This is one shot I am very proud of: (View it in large in my Flickr photo album)
Flowers and vegetables

The third one is also a flower shot with small bokeh in foreground and a larger more out of focus bokeh in background.

Shubhrajit's day out: Watercolors in the rain

The last in today's series is a planned treatment of mine. The bokeh is not very asthetically pleasing, but I believe it blends well with the subject and my treatment.
Smoking is injurious to health
Let me know how you feel about these photos and show me yours.

Sunday, January 25, 2009

Photographing the perfect sunset

Sunset has been the favorite subject of photography, due to the rich, warm tones cast by the slanting rays. Every sunset we see, stirs something within us, and when we look back at them, we re-live the memories that happened at that particular date/time. However, the viewers of the photo, who was not there with us and who has seen a lot of sunset photos may not find them as interesting as we seem to see it.

I have shot many sunset scenes, but there was only one shoot which I feel have enough substance to justify being a post in my photographic blog. It had all the elements to create a spectacular sunset portfolio.

So what makes a sunset photo interesting. As quoted by some professional photographers, the sunset should be complimented by a interesting backdrop and a perfectly still water in front to create a stunning reflection.

I will post here four images, shot at the catskill mountains. The peaks provide the backdrop, while the Ashokan Reservoir gives that perfectly still water reflections. Do judge them and tell me what you think.

Interestingly, I was without a camera during the shoot, so my friend's wife kindly let me have her Panasonic Lumix "point and shoot" to do my "own stuff". My friend on the other hand was using his Nikon D80 and at my insistance was using RAW mode for the shoot.

Ok ... here goes the first one ... shot by my friend Sumit Mishra with his D80. Converted to JPG and post processing by me.

From Blog


The second one was also shot by my friend in his D80. Converted to JPG and post processing by me. I have converted it to Black and White as I feel in a proper sunset shot, BW removes the warm color, and your tonal ranges stand out. Let me know what you think.

From Blog


The third and fourth was shot by me with a Panasonic Lumix point-and-shoot. You can see for yourself that the results are comparable to the Nikon D80. This firmly asserts my conviction that great photos depend more on the ambience and the photographer and less on the equipment. By the way, I felt that Panasonic Lumix cameras are the best point-and-shoot I have ever seen, so if you are thinking of buying a point and shoot, do evaluate these as your options.

In both the photos, I have silhouetted my friends in foreground to give another dimention to the photo. Let me know if you like them (or not)

From Blog

From Blog

Saturday, January 17, 2009

Photographing the abstract

This is the one of the most debated aspect of photography. I might photograph something abstract and it might be of great interest to me, but it may not appeal to the general viewer.
The reason for abstract photography : well in my case, living in a jungle of concrete, I don't get enough chance to shoot nature, so after a time, I get bored with shooting whatever I do, and dwell in the realm of abstract. Judge for yourself, if you can identify and enjoy some of the images posted here.

The first one I will start with is a shadow picture. I have a dancing girl statue, which was lit with bedroom lighting. The two lights cast directional shadows on the wall, and I decided to shoot the line-up. Taken with my point-and-shoot Olympus SP510UZ.
Shadows

The next one is a great favorite of mine. I shot this in the corridor of our apartment complex during my short trip to USA. I like the composition because of the guiding lines, the minimalism and the tones, making it very simple. Taken with my point-and-shoot Olympus SP510UZ. (At that time I only owned one camera).
Unedited: "The Passage"

This one is first of my two shots, which made to explore. This won't be properly visible in a monitor with high contrast, so in case you don't see this properly, please pardon me. I use an IBM R series laptop and the soft variations of tone are visible in my monitor.
Crystal Ball Gazing

The fourth one (and the fifth) I am showing here are the photos of the same object. I have a CFL (Compact fluoroscent Lamp) in my bedroom, and sometimes I make it the subject of my photographs.

Simplicity

the same lamp, in a different orientation ... makes another interesting composition.
From Blog


The last photo in today's set is a picture of a toy plastic tumbler with LEDs fitted. The LEDs has cast a strange glow making it a strange composition.

What is this?

I hope you like some of the results posted above. Let me know how you feel of these. Show me your abstract photos. I have some more which I will post in a future article.

Saturday, January 10, 2009

My experiements (And probably Failures) with Portrait Lighting: Portrait 151

Use of lighting can make your portraits very interesting. Now, if you are a portrait photographer who shoots outside, then you don't have a problem. Sun is a brilliant light source for portrait photography and you get to work with a big field, so you can control your depth of field to blur your background suitably.
If you are a professional and have access to a studio, you are also good to go. Studio's offer you a lot of lighting to be creative.

Now what happens to amateur photo enthusiasts like us, who need to shoot within cramped furnishings of our house? This is a big challenge, specifically so, you are probably under a strict budget, and lack of access to a studio means that you are shooting against a clutter.

Recently I have bought a set of Vivitar wireless flashes (See below) for my portrait work within the cramped spaces of my house.

My new toys

These flashes provide lighting of a wonderful color temperature (5500K) and light the subjects very well. However I am still finding it a little difficult to control these flashes with my Sony Alpha300.

The first two pictures I am going to show is perfectly balanced lighting, bounced of the ceiling. I have used 1 flash for the photo of my son, and two flashes for the photo of my wife. The flashes are bounced of the ceiling and the color of the walls have set a color cast.


From Blog

From Blog


Both of the above images have light which is diffused and is well balanced. Now lets see what happens, when I tried to use a light which is more directional. In the following photo, my wife was busy doing some chores, when I put two directional flashes on her face from a distance. The face is a bit washed out (the flashes are manual and have a very high intensity), but it gives a bit of a mood to the photo. (Judge it for yourselves)
From Blog

Another interesting thing I have found out originating from a mistake. When I am bouncing a flash from the sky, sometimes it gets deflected out of the ceiling fan if I have not positioned the flash correctly. Now this gives rise to some photo effects which I found interesting ... apparently very few others did, but I have included one such example here anyway: afterall the mistakes should also be published.
Rinki
The last photo I would like to publish in todays article when I was shooting my sister-in-law. I was using multiple directional flashes, and my mistake in balancing the intensity and direction produced some interesting shadows. One such example posted below:
From Blog


If you have read this upto here, you might be wondering what is it I am trying to say through this post. Well, I believe photography is a creative pursuit, and if you dare to digress from what everyone does, while still keeping in mind the basic rules of good photography, you will bring out something which will be cherished by you. This post is titled lighting, as lighting is one aspect which can generate a lot of interest in the photo.
Do let me know what do you think. If you have suggestions, please post them as comments.

Sunday, January 04, 2009

Composing a Portrait 101 - Traditional Portrait Part 1

Photographing people is a very interesting pastime. I always believe that a photograph should tell you a story. In a portrait, the face is your canvas, and the expression you capture is your story.
Composing a portrait is very challenging as a photo artist, but I try to follow some standard techniques, which I have learnt from different online photo forums and websites, and interpreted as per my understanding, and personal creativity. Always remember, since these are my understanding, it may not always agree with the conventional, but also remember that photography is a creative expression, and use your creativity to shoot great photos which you really like.
In this article I would stick to what you call a conventional portrait. Portraits can also be unorthodox, but I would not cover it in this part of the article here. You can visit some of the portrait groups in Flickr to see some stunning portraits taken by some of the members.
Ok ... so here goes the tips

Put one eye of the subject on a diagonal

This is a very standard portrait technique, derived from the standard photographic techniques. Human mind is very fond of the diagonal pattern, and follows the diagonal in the photo, either visible or imaginary.
Of the two diagonals, the one from bottom left to top right is more interesting!!!
Rinki


Choice of background and understanding colors

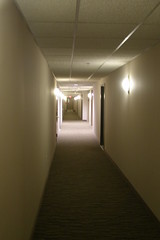
When you compose a photo, your frame should be minimalistic and uncluttered. Human mind tends to lose focus when it has too much of subject to digest. Use a background of a muted color. If you are shooting outdoors, use a shallow Depth of Field, to blur out the background.

The following photo uses a "bokeh" (blurred) background.

From Blog


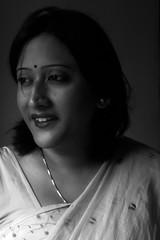
I had an interesting insight while shooting at my cousin's wedding. Indian weddings are traditionally a "RED" affair. People wear red and decorate the marriage hall with red. Now red is a color in photography, which immediately draws attention. The bride was wearing a red saree, sitting on a red throne on a red dias. Now that's a photographic nightmare.. since everything else but the bride was clamouring for attention. To top it all, everything was creating a red color cast. In this situation, I would go for a black and white shoot. For example this shot of Garima, wearing a red dress, but done in black and white.

Garima

Creative use of Shadows and lights

This tip is my own. I like to use shadows to create an aura of mystery. Although I received a fair amount of negative criticism on this technique, I still like it!!! Judge for yourself.

Rinki in a saree
This photo violates the rule of diagonals, and some monitors, will be a little too dark. I like it all the same.
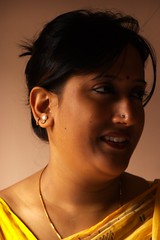
Use of space
If your subject is looking at a particular direction, try to include some space there. This creates interest of the viewers on the invisible object your subject is viewing.
For example see the following portrait

From Blog


Use of creative lighting
Experiment with directional lighting. You will get surprised with your results. For example, in the picture below I was planning to use light bounced from the ceiling. However the model (My wife) was standing too close to the powerful flash and got some harsh light on the top-right. I know that's a mistake, but I decided to keep the shot, as I found it to contain a lot of mystery.

Rinki

Use of textures
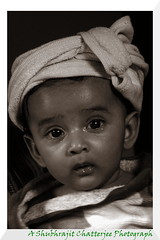
Well, this is a common tip. Many photographers shoot old people to capture the wrinkles. See this technique in action from a different perspective: Water drops and a wet texture on my son's face.


My Son Ricky


Last, I would ask you to look at the works of other people whose portrait shots you like and see what draws you to their work. Take a lot of photos, analyze your work and try to come up with your distinct style. This is my portrait 101, from a person who is into creative photography only for six months or so. My efforts would be rewarded though, if you find these tips useful.

In subsequent blog posts I would cover more techniques, improving my photos and hoping to help others to improve theirs. Do send in your comments and I will include them in subsequent posts. View My Flickr page to see my public gallery.